utorak, 6. listopada 2015.

Change of season

Sometimes it seems as if a summer is the shortest of seasons. It just whizzes by and it’s autumn again. 
And look at our apple tree. I think it is as beautiful in autumn as it was this spring.


I always hope that with shorter and colder days and less to do outside and in our garden I will find more time for crafty things. And I have several WIPs I hope to finish very soon:
A hat for my Big Girl is on my knitting needles.

There is something on my hook as well. Can you guess what it is?

Yes! Minion craze is going strong among the little ones in and around our home.
And there are some more things piling up around my sewing machine.
We won’t be bored. Autumn rains and short days and chilly evenings you can come. We are ready. We'll have plenty to do while eating apple pies :) 

subota, 9. svibnja 2015.

Enjoying


I have been enjoying this view a lot for a couple of days while lazing around in our trampoline watching our little Strawberry Cupcake “jump around” on her little bottom. Our little garden really is at its best while those apple trees are in full bloom. It’s a pity it lasts just a couple of days. They are such ordinary green now. But they have a secret to keep – a multitude of sweet juicy apples to be. I really really really love spring.

utorak, 14. travnja 2015.

Finally times three


No. 1 - When I saw Abby's tutorial for Josephine doll I thought it was FINALLY time to try and sew my first doll or two. I have been planning to do that for a couple of years. I have even bought some books, but I was afraid if I fail and the end result does not meet my expectations it will be the first and last doll for me. And I did not want that to happen. But Abby's dolls seemed easy enough and tutorial very detailed. And I am actually happy with the result. Although I have to say everything seems so easy when a pro does it. And I really struggled to get the limbs out of the body (next time I will try to pull them out with a crochet hook). And I overstuffed the head which (in combination with poor quality felt) resulted with my dolls looking as if they are getting bald. But despite their shortcomings they are very well loved.

No. 2 – The weather is FINALLY nice and sunny and springlike and we are really enjoying it. Spring is definitely my favourite season. So the dolls seized the opportunity to have a picnic in our garden and I used the chance to take a couple of pictures of them soaking up the sun.

No. 3 – And I have FINALLY written one more post! 

ponedjeljak, 8. prosinca 2014.

Grey skies and candlelights


Yesterday we lit the second candle on our Advent arrangement. Candles give such lovely light when the skies are grey and it's raining. They make even the gloomiest of days seem a bit less so. And though I know this post is at least ten days too late I had to share this image of our quick and easy simple little Advent arrangement with the world. Big Daughter and I collected these little pine cones a few weeks ago, but we planned to make an arrangement with lots of greenery. However on Saturday before the first Sunday of Advent I realized I didn't have any time or greenery to make it. So I asked Big Daughter to help me make it with some hazelnuts and walnuts we had. She was so excited. I gave her a little cake tray, candles and nuts and she arranged them. I just helped a bit (some cones kept falling off the tray). When it was all arranged she said we needed one more thing. She went out of the room and came back with a ribbon from my stash and told me to tie it around the candles. I obeyed. She looked at it and said: Now it's perfect!
We really love our simple candle arrangement because it was so quick and easy to make, it's so simple and I love it because it turned out to be a nice Christmas craft for my Big Daughter and me :)
So, enjoy your grey winter days with the warm glow of candlelights, but do not leave your candles burning if you leave the room!
Bye! Bye!

petak, 5. prosinca 2014.

Long time no see


Time really does fly, doesn’t it? I could swear the Earth is spinning faster every day, well at least in my patch of it. This blog has been really very quiet for some time now, but life has been everything but.
Quite a lot of housework has been done lately of the building/ home improvement kind by my husband (that's why it is taking so much time) in the attic to turn it into new bedrooms for  all of us. Hopefully we will be able to move in upstairs by the time I go back to work next spring :)

The most important (even life changing) thing that hapened was the fact that our Big Daughter celebrated her 7th birthday and started school! Boo hoo, I was sad despite her excitement. Once again, time flies, doesn’t it?

And as for crafting, the following conversation between Big Daughter and me will tell you everything about it:
BD: Mum, you don't have a hobby anymore, do you?
I: Why would you think such a thing?
BD: Well, you don't knit anymore and you've given your jewlery making kit to aunt Ana.

It's all true. And I have to do something about it ASAP! However there was just a smidge of crafty time as well. Well, mostly back in September. Some chunky wool autumn kind of crochet during homework writing supervision time.


And a little bit of patchworky hexagon play.


Right. Now I've got to dash and try to have some housework done (nothing crafty about that, right?) while Baby Sister is asleep.

utorak, 29. srpnja 2014.

Free Hat Pattern Maker


I just had to pop in for a minute to share with the you what I have found. I was looking for a pattern for a sun hat for my daughter and found this programme Wild Ginger Pattern Maker. It is a great programme (and it is FREE) for making different patterns (differrent hat styles, bags and such) where you enter the head circumference you need, the depth of the hat and the width of the rim that you want and the programme creates a pattern for you to print out. I can't wait to try it out. I’ll come back to show you the result as soon as I sew the sun hat.I hope you will like it too. Bye!

P.S. There are written instructions on how to put it all together as well. Isn’t it great?!


ponedjeljak, 21. srpnja 2014.

Bibs in a row - my bib tutorial with the PDF pattern


My lovely baby girl is at that stage when her little hand is constantly in her mouth and she sucks at it with such gusto (I don't blame her - those little fingers are so sweet, but I hope she is not teething already) so she drools a lot and she also burps a lot, so we need lots of bibs. And we have plenty of them, it is just that I don’t like those that have to be tied at the back. I 
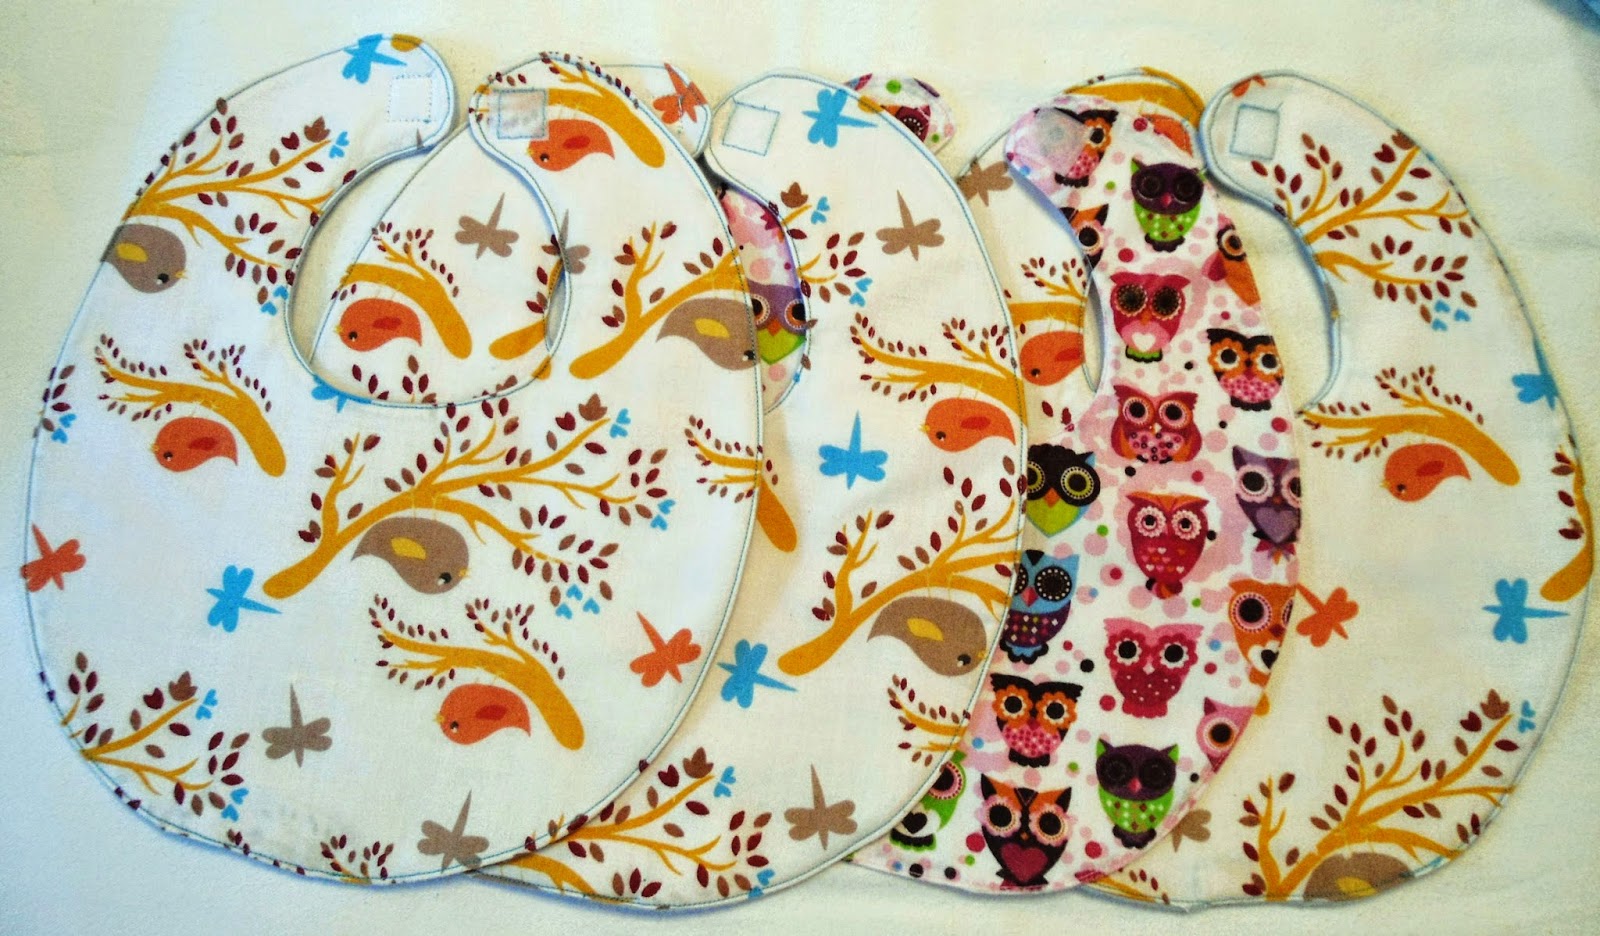
prefer the ones with the Velcro. So I decided to sew a few of our own. I searched the web and some books and I found several great tutorials, I tried one out, but I didn’t like the size of the bib, so I made a pattern of my own, because we need a bib to be a bit bigger and wider on the shoulders to get enough coverage. I made one trial bib from my very own pattern (that's the one with the owls) and I was satisfied. So I decided I need to make more of them at once in as little time as possible, and this is how I did it.

  1. You choose your three fabrics: one for the front, one for the middle and one for the back of your bibs.
  2. You cut enough fabric to make three bibs (or more) at a time, with enough space around them for 1.5cm seam allowance around the pattern for each of them.
  3. You then iron the fabrics: first the front one facing the right side up; then put the back fabric on it facing the right side down and then iron the middle fabric on the top. They will stick to each other a bit and make next steps easier.
  4. Tack your fabric sandwich.
  5. Draw the pattern on the fabric.
  6. Sew the bibs together along the chalk line leaving 3-4cm opening at the bottom for turning.
  7. Now cut around the bibs leaving the 1.5cm seam allowance.
  8. Clip the front bib fabric around the neck.
  9. Pull out the tacking and iron the front fabric away from the back fabric to open the seam. It will make it a lot easier to make a nice edge once you turn the bib inside out.
  10. Now cut the seam allowance down to only 2-3mm (if you cut it like that immediately, you won’t be able to iron the seam nicely), but leave it wider where you left the opening, so that you can easily tuck it in once you turn the bib inside out.
  11. Turn the bib inside out.
  12. Use something pointy but not sharp to push the seams out as much as you can along the whole bib to make the topstitched edge look nice and neat.Tuck in that extra bit of fabric where your openning is.
  13. Iron it.
  14. Topstitch all around the edge.
  15. Now sew a piece of hooky Velcro on the back of the one bib wings or flaps or whatever they are called (I think it won’t scratch your child’s neck or get entangled into his hair if it is at the back) and the other part on the front of the other wing.
  16. There you are. Try it on.
And here is my PDF bib pattern for you to print out and try.

P.S. If you have fabric with a sort of directional pattern, don’t make my mistake and turn it upside down. Sorry, I did it because I was so excited about tutorial writing and all the photo taking. Such a silly rookie mistake.